> ## Documentation Index
> Fetch the complete documentation index at: https://new-fb342056.mintlify.site/llms.txt
> Use this file to discover all available pages before exploring further.
# SIP Integration
> Connect your existing phone system and numbers to Robocallz.ai
Select the country where your SIP trunk is provisioned.This guide will help you understand and set up SIP integration. If you need clarification during setup, our support team is available to assist.
## **What is SIP Integration?**
SIP (Session Initiation Protocol) integration allows you to connect your existing phone system to [Robocallz.ai](http://Robocallz.ai). Think of it as building a bridge between your current phone setup and our AI platform. This means you can:
* Use your existing phone numbers with our AI assistants
* Keep your current phone system and provider
* Make and receive calls through your existing setup
* Maintain full control of your numbers
* Reduce carrier costs by using local VoIP providers with better rates
## How It Works
When you integrate your phone system with [Robocallz.ai](http://Robocallz.ai):
1. **Inbound Calls**: Calls to your numbers are routed through your phone system to our AI assistants
2. **Outbound Calls**: Our AI assistants can make calls appearing from your numbers
3. **Management**: You keep managing your numbers through your current provider
4. **Cost Efficiency**: Leverage your VoIP provider’s competitive rates for call termination
## Integration Options
You can connect your phone system to [Robocallz.ai](http://Robocallz.ai) in two ways:
## 1. PBX Extension Integration
This is like giving our AI platform an “extension” on your phone system:
* **What it is**: Connect a specific extension from your PBX/phone system
* **Perfect for**:
* Testing the integration
* Routing specific extensions to AI
* Simple setup with existing phone systems
* **You’ll need**:
* Your extension number (e.g., 1000)
* Extension username and password
* Your PBX server address (e.g., [pbx.yourcompany.com](http://pbx.yourcompany.com))
**Real-world example**:
```text theme={null}
Your office uses extensions 1001-1010 for staff
You set up extension 1011 for the AI assistant
Calls to 1011 go to the AI
The AI can make calls appearing as extension 1011
```
### 2. Direct Number Integration
This connects specific phone numbers to our platform:
* **What it is**: Route one or more of your phone numbers to our AI
* **Perfect for**:
* Dedicated AI phone lines
* Customer service numbers
* Sales or support lines
* **You’ll need**:
* Your phone number (e.g., +1 555 0123)
* SIP credentials from your provider
* Provider’s SIP server address
**Real-world example**:
```text theme={null}
You have a support number: +1 555 0123
You connect this number to our AI
All calls to +1 555 0123 are handled by the AI assistant
The AI makes outbound calls showing +1 555 0123
```
## Authentication & Call Flow
### Bidirectional Configuration
The SIP integration uses the same credentials for both inbound and outbound calls:
* **Inbound Calls** (VoIP → [Robocallz.ai](http://Robocallz.ai)):
```text theme={null}
Your VoIP system authenticates using username/password
↓
Calls reach our platform
↓
AI assistant answers
```
* **Outbound Calls** ([Robocallz.ai](http://Robocallz.ai) → VoIP):
```text theme={null}
AI initiates call
↓
Our platform authenticates to your VoIP using same username/password
↓
Call reaches destination
```
## Credential Synchronization
For the integration to work properly:
1. The credentials you set in [Robocallz.ai](http://Robocallz.ai) dashboard must match exactly with your VoIP configuration
2. The same username/password combination is used for both directions
3. Any changes to credentials must be updated in both systems
If you change credentials in your VoIP system, remember to update them in [Robocallz.ai](http://Robocallz.ai) dashboard (and vice versa) to maintain the connection.
## **Setting Up Your Integration**
## Step 1: Gather Your Information
For PBX Extension:
```text theme={null}
Extension number: e.g., 1000
Server address: e.g., pbx.company.com
Username: Your extension username
Password: Your extension password
```
For Direct Number:
```text theme={null}
Phone number: e.g., +1 555 0123
SIP server: e.g., sip.provider.com
Username: Provided by your phone company
Password: Provided by your phone company
```
## Step 2: Configure in Dashboard
1. Go to your [Robocallz.ai](http://Robocallz.ai) dashboard
2. Navigate to **Your Phone Numbers**
3. Click “Integrate SIP trunk”
## Step 3: Select SIP Trunk Type
At the top of the form, select one of these trunk types:
* **SIP Extension** - Use this if you already have an existing SIP credential (an extension) provided by your VoIP provider.
* **Phone Number (DID)** - Use this if you want to integrate a dedicated Direct Inward Dial (DID) number instead of a generic SIP extension.
For PBX Extension:
```text theme={null}
Extension number: e.g., 1000
Username: Your extension username
Password: Your extension password
```
 For Direct Number:
```text theme={null}
Phone number: e.g., +1 555 0123
Username: Provided by your phone company
Password: Provided by your phone company
```
For Direct Number:
```text theme={null}
Phone number: e.g., +1 555 0123
Username: Provided by your phone company
Password: Provided by your phone company
```
 ### **Step 4: Outbound Settings**
These settings control how [Robocallz.ai](http://Robocallz.ai) sends outbound calls through your SIP provider.
* **SIP Address** - Enter the address/server of the SIP trunk without the port.
* **Outbound Proxy (Fixed IP)** - Some SIP providers require calls to originate from a single, whitelisted IP address. Configure this as follows:
* **Toggle ON** - If your SIP provider requires a fixed source IP, enable Outbound proxy will come from a fixed IP address. [Robocallz.ai](http://Robocallz.ai) will then send all outbound requests through a known static IP. Use this option only if your provider explicitly requires a single source IP.
* **Toggle OFF:** - If your provider accepts calls from any IP, leave this option off. In that case, [Robocallz.ai](http://Robocallz.ai) will send calls from dynamic IPs.
*
```text theme={null}
SIP address: (e.g., pbx.company.com/sip.provider.com)
```
### **Step 4: Outbound Settings**
These settings control how [Robocallz.ai](http://Robocallz.ai) sends outbound calls through your SIP provider.
* **SIP Address** - Enter the address/server of the SIP trunk without the port.
* **Outbound Proxy (Fixed IP)** - Some SIP providers require calls to originate from a single, whitelisted IP address. Configure this as follows:
* **Toggle ON** - If your SIP provider requires a fixed source IP, enable Outbound proxy will come from a fixed IP address. [Robocallz.ai](http://Robocallz.ai) will then send all outbound requests through a known static IP. Use this option only if your provider explicitly requires a single source IP.
* **Toggle OFF:** - If your provider accepts calls from any IP, leave this option off. In that case, [Robocallz.ai](http://Robocallz.ai) will send calls from dynamic IPs.
*
```text theme={null}
SIP address: (e.g., pbx.company.com/sip.provider.com)
```
 ### **Step 5: Number Format Configuration**
This tells our system how to format phone numbers when making calls. Choose based on your provider’s requirements:
1. **International with +**
Copy
```text theme={null}
Format: +[country][number]
Example: +1 202 555 0123
SIP Request: sip:+12025550123@your.pbx.com
```
2. **International without +**
```text theme={null}
Format: [country][number]
Example: 1 202 555 0123
SIP Request: sip:12025550123@your.pbx.com
```
3. **National format**
```text theme={null}
Format: [local number]
Example: 0741926265
SIP Request: sip:0741926265@your.pbx.com
```
### **Step 6: Inbound Settings**
These settings determine how Autocalls.ai receives and authenticates inbound calls from your SIP provider.
1. **Our SIP Address** - Autocalls.ai assigns a unique inbound SIP URI `5wed79aeavr.sip.livekit.cloud`. Your SIP provider must be configured to send inbound calls to this address by pointing their outbound trunk or routing rule to this URI.
2. **IP Address (Whitelist IPs)** - If your SIP provider can send calls from a known set of public IP addresses, choose IP Address. Then add each provider IP to the whitelist under Inbound Authentication.
3. **Username and Password** - If your provider supports SIP auth, choose Username and password. The same credentials you entered under Outbound Settings (username/password) will be used to authenticate inbound calls. Make sure your provider’s PBX is configured to include those credentials.
### **Step 5: Number Format Configuration**
This tells our system how to format phone numbers when making calls. Choose based on your provider’s requirements:
1. **International with +**
Copy
```text theme={null}
Format: +[country][number]
Example: +1 202 555 0123
SIP Request: sip:+12025550123@your.pbx.com
```
2. **International without +**
```text theme={null}
Format: [country][number]
Example: 1 202 555 0123
SIP Request: sip:12025550123@your.pbx.com
```
3. **National format**
```text theme={null}
Format: [local number]
Example: 0741926265
SIP Request: sip:0741926265@your.pbx.com
```
### **Step 6: Inbound Settings**
These settings determine how Autocalls.ai receives and authenticates inbound calls from your SIP provider.
1. **Our SIP Address** - Autocalls.ai assigns a unique inbound SIP URI `5wed79aeavr.sip.livekit.cloud`. Your SIP provider must be configured to send inbound calls to this address by pointing their outbound trunk or routing rule to this URI.
2. **IP Address (Whitelist IPs)** - If your SIP provider can send calls from a known set of public IP addresses, choose IP Address. Then add each provider IP to the whitelist under Inbound Authentication.
3. **Username and Password** - If your provider supports SIP auth, choose Username and password. The same credentials you entered under Outbound Settings (username/password) will be used to authenticate inbound calls. Make sure your provider’s PBX is configured to include those credentials.
 ### **Step 7: Country Selection**
Select the country where your SIP trunk is provisioned.
### **Step 7: Country Selection**
Select the country where your SIP trunk is provisioned.
 ### **Step 8: Verify Setup**
After configuration:
1. Make a test call to your number/extension
2. Check that the AI assistant answers
3. Use the test call feature to verify outbound calling
## **Security Requirements**
Your SIP credentials need to be secure:
* **Username**: Your extension number or provider-supplied username
* **Password must have**:
* 12 or more characters
* Numbers
* Upper and lowercase letters
* Special characters recommended
## **Common Questions**
**Can I use multiple numbers?**
Yes! You can integrate multiple extensions or direct numbers with our platform.
**Will I lose control of my numbers?**
No, you maintain full control through your current provider. The integration only establishes a connection between your system and our platform.
**Can I still use my numbers for regular calls?**
Yes, you can set up routing rules in your phone system to decide which calls go to the AI and which go to your regular phone system.
**What if I need to change settings later?**
You can update your integration settings anytime through the dashboard. All configuration options remain accessible after initial setup.
**How does this help with call costs?**
By using your own VoIP provider, you can take advantage of their local rates and existing agreements, which are often more competitive than standard carrier rates. This is especially beneficial for international calls.
Need help setting up? Our support team specializes in helping customers integrate their phone systems. We’ll guide you through the entire process, ensuring a smooth setup with your specific phone system configuration.
# **Twilio Integration**
A step by step guide to connect to your Twilio account via SIP trunking
## **Step 1: Create Elastic SIP Trunking**
1. Create the trunk, give it a name, and toggle some general settings

2 . Setup termination (this is for outbound)
* the termination SIP URI here is important, we would use it in later steps. You might want to use a localized termination uri that’s near your region. You can expand and view your localized uris in the twilio console.

* For your elastic SIP trunk to accept our outbound request, you need to whitelist IP address or create a auth with username and password.
* Currently Autocalls SIP server does not have a static IP, so if you opt for the IP route, you need to whitelist all the IP addresses in the range like following:


3. Setup origination (this is for inbound)
* Here you will specify Autocalls SIP server address as the origination SIP URI: `sip:5wed79aeavr.sip.livekit.cloud`

## **Step 2: Move numbers to Elastic SIP Trunking**
You’ve created the elastic SIP trunk, now you would need to purchase numbers / move existing numbers to this trunk.

## **Step 3: Import numbers to Robocallz**
Now the number is set up with your elastic SIP trunking, you need to import the number to Robocallz so that we will know how to route the call.
1. Go to your [Robocallz.ai](http://Robocallz.ai) dashboard
2. Navigate to **Your Phone Numbers**
3. Click “Integrate SIP trunk”
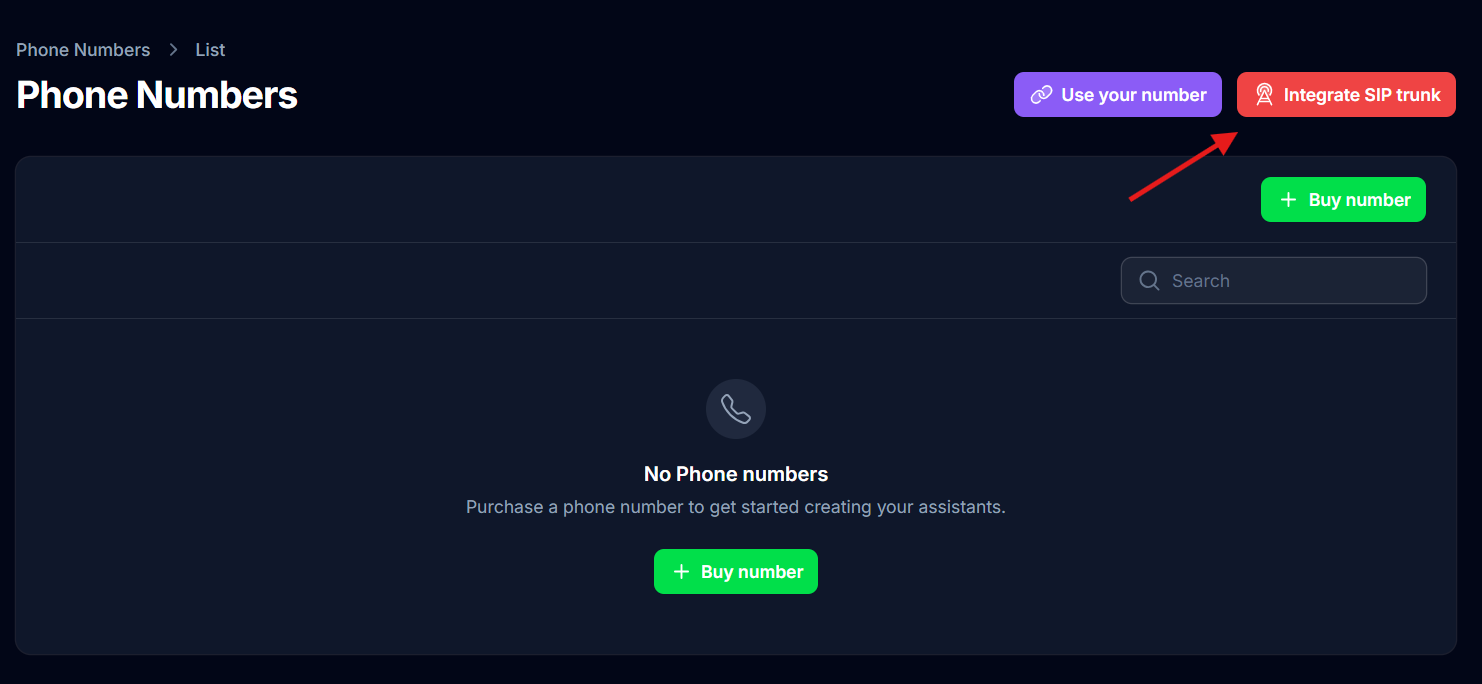
4. Fill in your details based on your integration type
```text theme={null}
Phone number: e.g., +1 555 0123
Username: Your extension username
Password: Your extension password
```
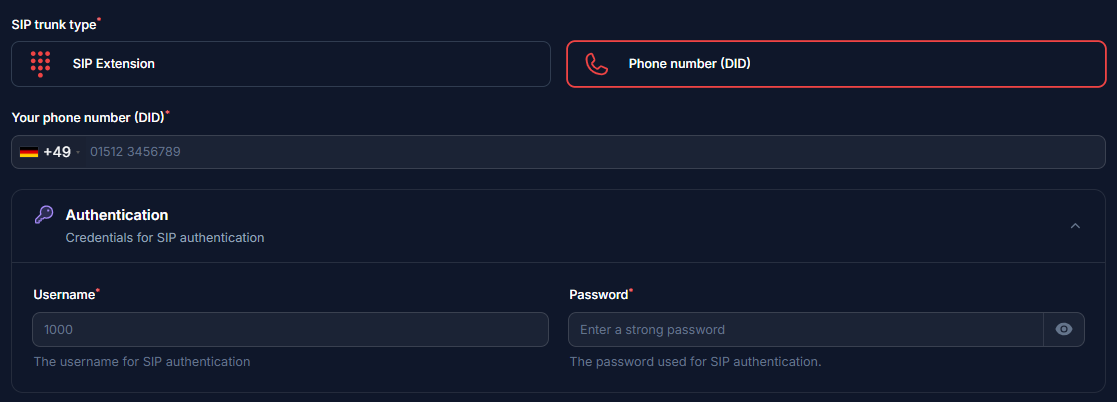
5. Here you will supply the termination SIP URI you set up in Step 1.
```text theme={null}
Server address: e.g., xxx.pstn.twillio.com
```

6. Here select Authorization type as you opted in step 2.
* If IP type is the option you have selected, add the IPs
```text theme={null}
54.244.51.0
54.244.51.1
54.244.51.2
54.244.51.3
54.172.60.0
54.172.60.1
54.172.60.2
54.172.60.3
```
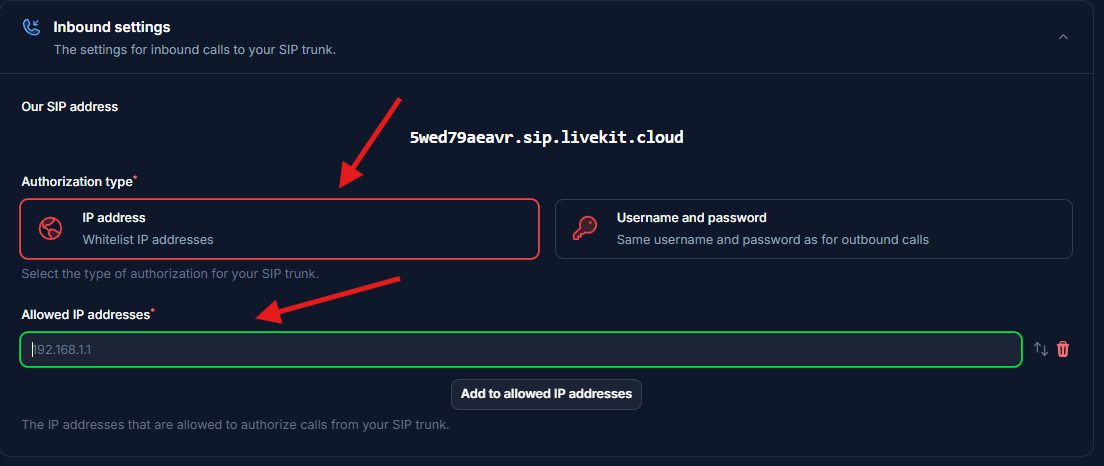
7. Select the country of where your SIP trunk is located.

### **Step 4: Verify Setup**
After configuration:
1. Make a test call to your number/extension
2. Check that the AI assistant answers
3. Use the test call feature to verify outbound calling
## [****](https://docs.autocalls.ai/provisioning/sip-trunking/twilio#security-requirements)
**Security Requirements**
Your SIP credentials need to be secure:
* **Username**: Your extension number or provider-supplied username
* **Password must have**:
* 12 or more characters
* Numbers
* Upper and lowercase letters
* Special characters recommended
## [****](https://docs.autocalls.ai/provisioning/sip-trunking/twilio#common-issues)
**Common Issues**
**After connecting, inbound works but outbound does not work?**
* Check your Termination SIP URI If there’s a space in it, please remove. Also you should use a localized termination uri that’s near your region. Check out this [**doc**](https://www.twilio.com/docs/global-infrastructure/localized-uris/termination) to select one.
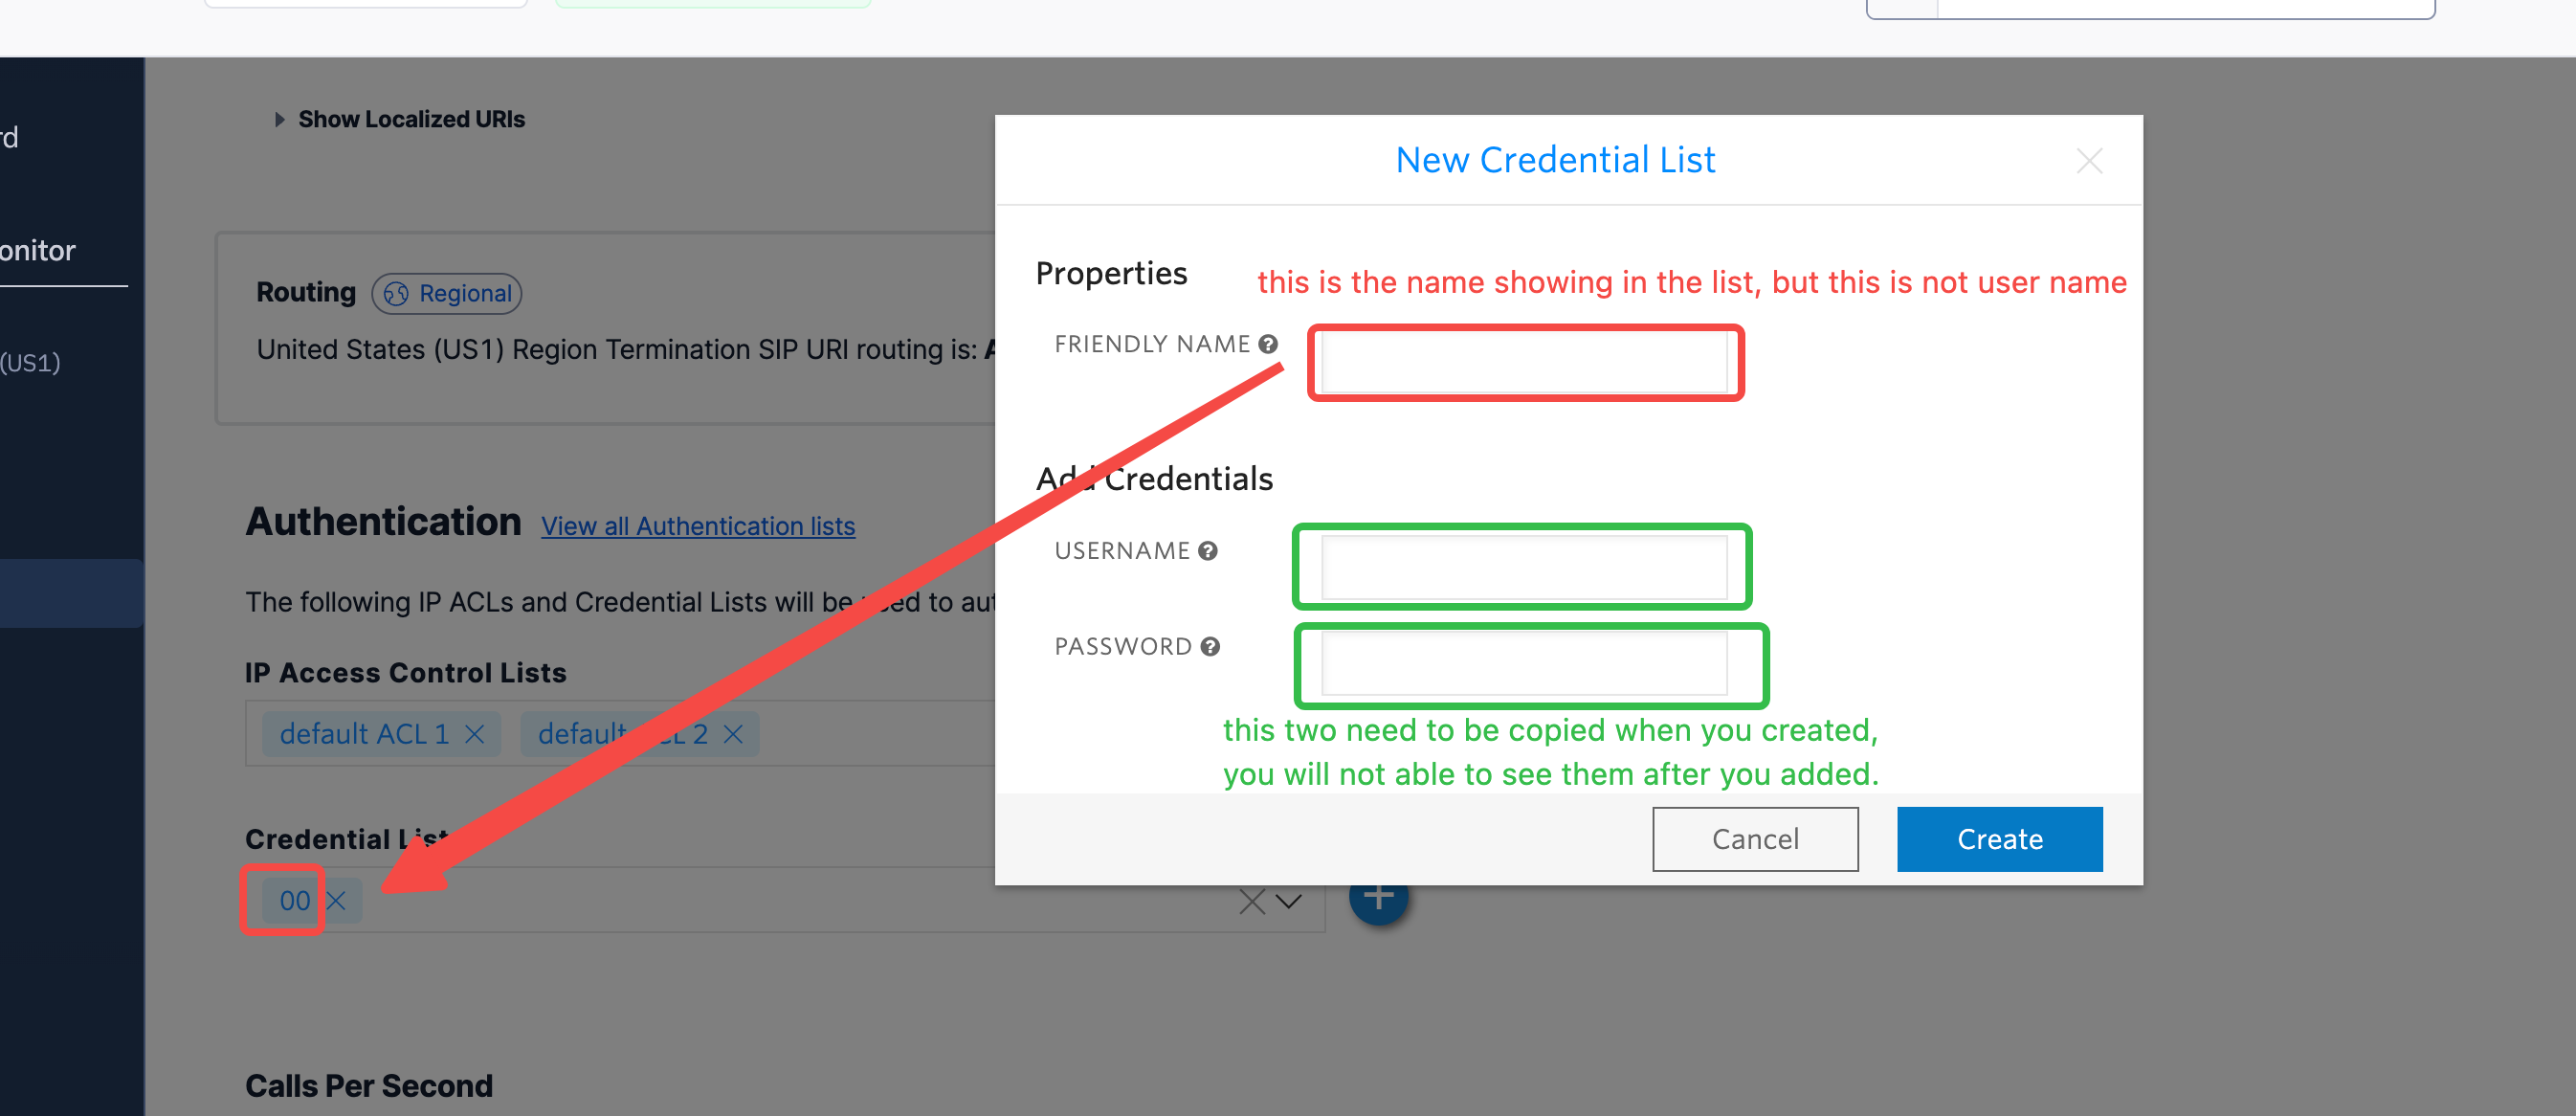
* Check your user name and credentials Please make sure you entered the right user name and credentials which shows in this dialog. Please note the user name is not the friendly name that shows in the credential list. The friendly is different to user name, you need to double check if you happen to give a different name.
Need help setting up? Our support team specializes in helping customers integrate their phone systems. We’ll guide you through the entire process, ensuring a smooth setup with your specific phone system configuration.
# **Zadarma Integration**
A step by step guide to connect to your Zadarma account via SIP trunking
## **Step 1: Gather Your Information**
* PBX Extension:
Go to My Switchboard, Extensions on the main page.
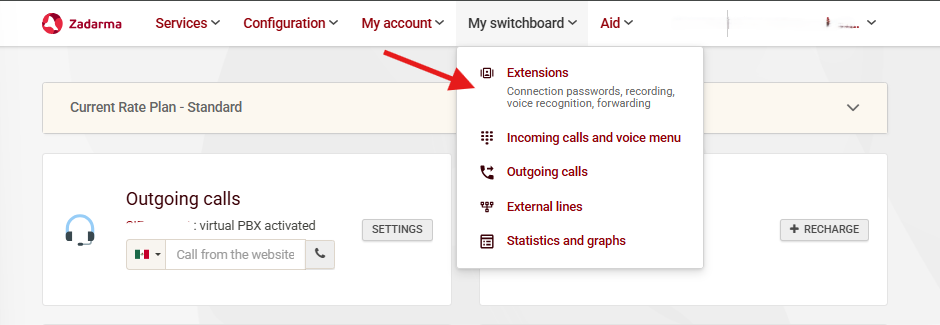
Find the following information:
```text theme={null}
Extension number: e.g., 1000
Server address: e.g., pbx.zadarma.com
Username: Your extension username
Password: Your extension password
```

* SIP Connection:
```text theme={null}
Phone number: e.g., +1 555 0123
SIP server: e.g., sip.zadarma.com
Username: Provided by your phone company
Password: Provided by your phone company
```
Go to Configuration, SIP Settings on the main page.

Find the following information:

* For **IP Authorization type**:
1. Go to Services, Connect number on the main page.
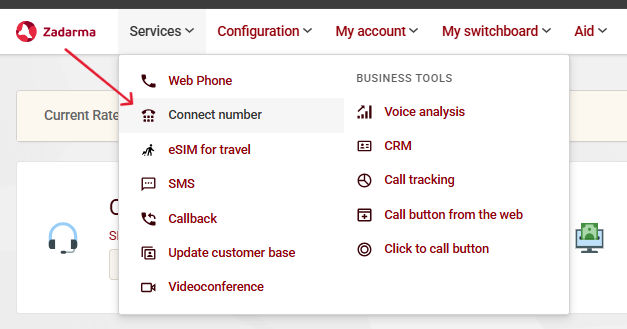
Go to Active numbers.
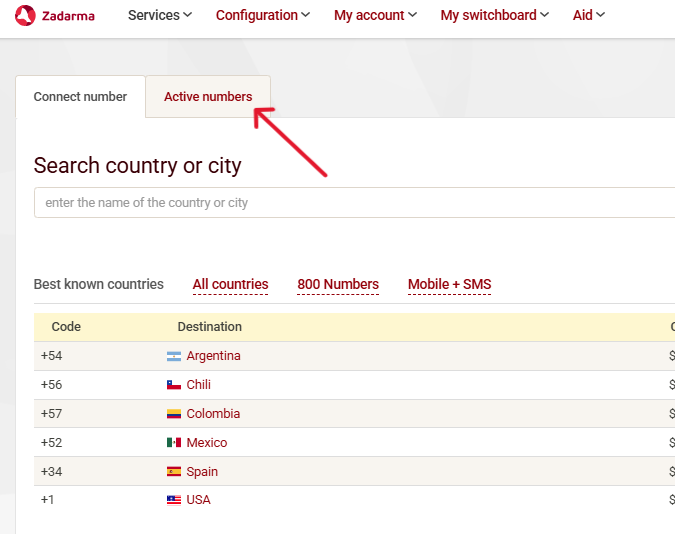
Click on the number you want to connect and press settings button.

1. Click on external services and then check the option for SIP URI.
Add `sip:extension@5wed79aeavr.sip.livekit.cloud `(this is Autocalls SIP server address) .
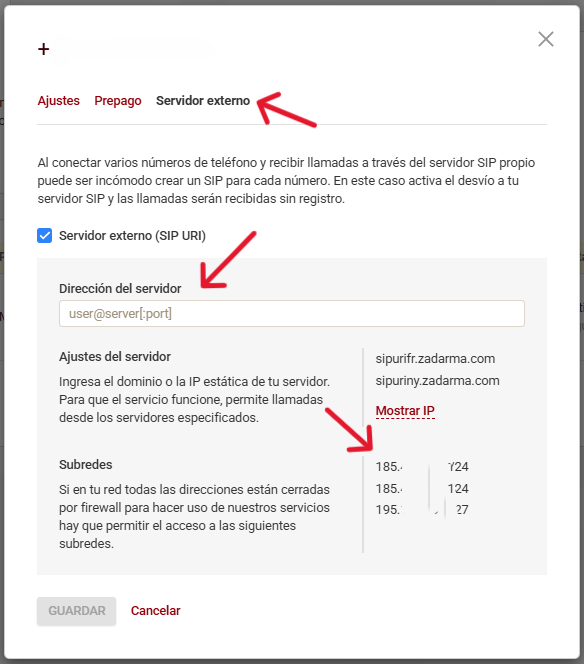
You will need these IPs which you will put in step 2 for inbound authorization type.
## **Step 3: Import numbers to Robocallz**
Now the number is set up with your elastic SIP trunking, you need to import the number to Robocallz so that we will know how to route the call.
1. Go to your [Robocallz.ai](http://Robocallz.ai) dashboard
2. Navigate to **Your Phone Numbers**
3. Click “Integrate SIP trunk”

1. Fill in your details based on your integration type
For PBX Extension:
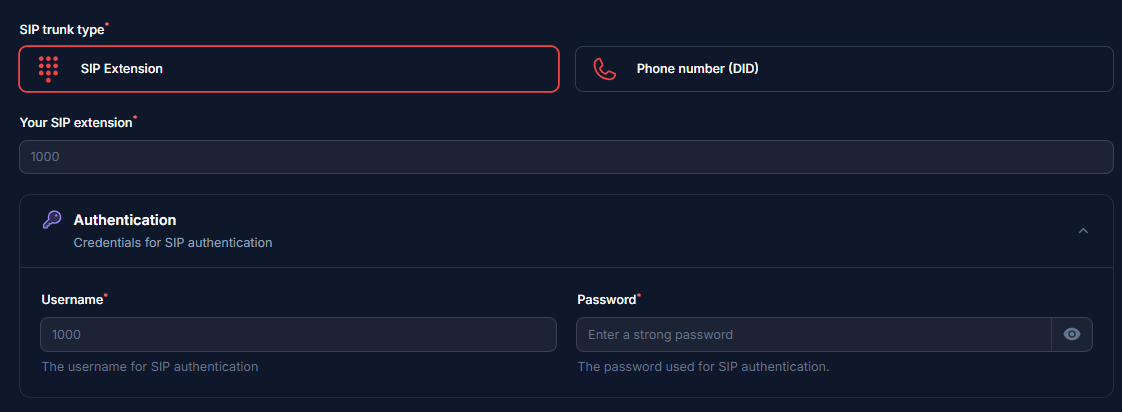
For SIP Connection:

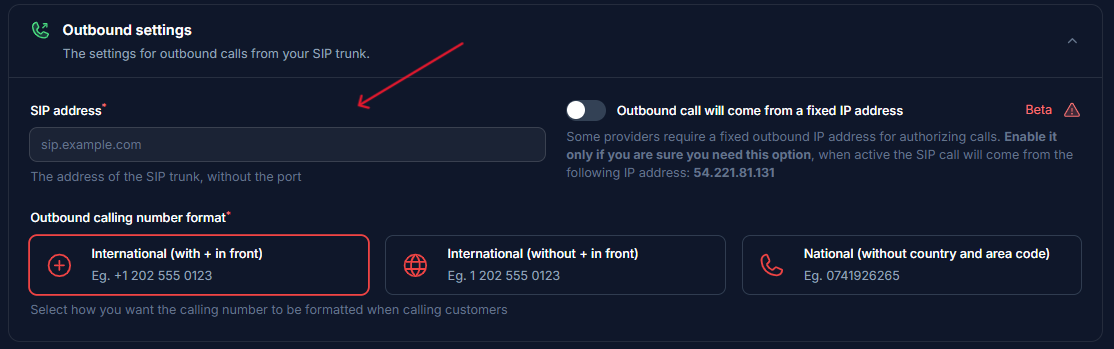
5. Here you will supply the termination SIP URI you set up in Step 1.
```text theme={null}
Server address: e.g., pbx.zadarma.com / sip.zadarma.com based on your integration type
```
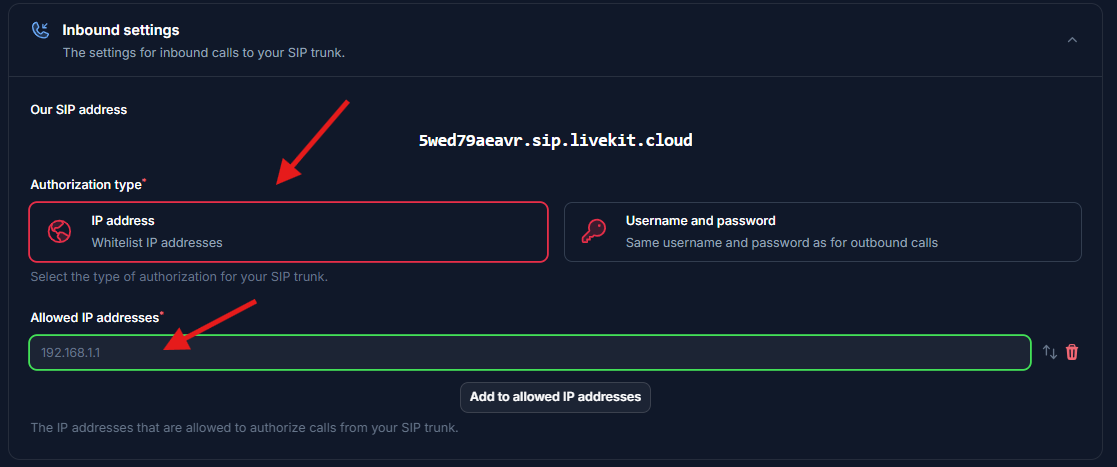
6. Here select Authorization type.
* Add the **IPs** from **Zadarma** (Step 1).
Select the country of where your SIP trunk is located.
\\
## Step 3: Verify Setup
After configuration:
1. Make a test call to your number/extension
2. Check that the AI assistant answers
3. Use the test call feature to verify outbound calling
## Security Requirements
Your SIP credentials need to be secure:
* **Username**: Your extension number or provider-supplied username
* **Password must have**:
* 12 or more characters
* Numbers
* Upper and lowercase letters
* Special characters recommended
## Common Issues
## After connecting, inbound works but outbound does not work?
* Check your Termination SIP URI If there’s a space in it, please remove. Also you should use a localized termination uri that’s near your region. Check out this [**doc**](https://www.twilio.com/docs/global-infrastructure/localized-uris/termination) to select one.
* Check your user name and credentials Please make sure you entered the right user name and credentials which shows in this dialog. Please note the user name is not the friendly name that shows in the credential list. The friendly is different to user name, you need to double check if you happen to give a different name.

### **Step 3: Verify Setup**
After configuration:
1. Make a test call to your number/extension
2. Check that the AI assistant answers
3. Use the test call feature to verify outbound calling
## Security Requirements
Your SIP credentials need to be secure:
* **Username**: Your extension number or provider-supplied username
* **Password must have**:
* 12 or more characters
* Numbers
* Upper and lowercase letters
* Special characters recommended
## Common Issues
## After connecting, inbound works but outbound does not work?
* Check your Termination SIP URI If there’s a space in it, please remove. Also you should use a localized termination uri that’s near your region. Check out this [**doc**](https://www.twilio.com/docs/global-infrastructure/localized-uris/termination) to select one.
* Check your user name and credentials Please make sure you entered the right user name and credentials which shows in this dialog. Please note the user name is not the friendly name that shows in the credential list. The friendly is different to user name, you need to double check if you happen to give a different name.
**How do I set up dialing to international countries?**
* Search “geo” to find the “Voice Geographic Permissions” setting.
* Choose “Elastic Sip Trunking” in selector, and select the countries you would like to dial.
Need help setting up? Our support team specializes in helping customers integrate their phone systems. We’ll guide you through the entire process, ensuring a smooth setup with your specific phone system configuration.
### **Step 8: Verify Setup**
After configuration:
1. Make a test call to your number/extension
2. Check that the AI assistant answers
3. Use the test call feature to verify outbound calling
## **Security Requirements**
Your SIP credentials need to be secure:
* **Username**: Your extension number or provider-supplied username
* **Password must have**:
* 12 or more characters
* Numbers
* Upper and lowercase letters
* Special characters recommended
## **Common Questions**
**Can I use multiple numbers?**
Yes! You can integrate multiple extensions or direct numbers with our platform.
**Will I lose control of my numbers?**
No, you maintain full control through your current provider. The integration only establishes a connection between your system and our platform.
**Can I still use my numbers for regular calls?**
Yes, you can set up routing rules in your phone system to decide which calls go to the AI and which go to your regular phone system.
**What if I need to change settings later?**
You can update your integration settings anytime through the dashboard. All configuration options remain accessible after initial setup.
**How does this help with call costs?**
By using your own VoIP provider, you can take advantage of their local rates and existing agreements, which are often more competitive than standard carrier rates. This is especially beneficial for international calls.
Need help setting up? Our support team specializes in helping customers integrate their phone systems. We’ll guide you through the entire process, ensuring a smooth setup with your specific phone system configuration.
# **Twilio Integration**
A step by step guide to connect to your Twilio account via SIP trunking
## **Step 1: Create Elastic SIP Trunking**
1. Create the trunk, give it a name, and toggle some general settings

2 . Setup termination (this is for outbound)
* the termination SIP URI here is important, we would use it in later steps. You might want to use a localized termination uri that’s near your region. You can expand and view your localized uris in the twilio console.

* For your elastic SIP trunk to accept our outbound request, you need to whitelist IP address or create a auth with username and password.
* Currently Autocalls SIP server does not have a static IP, so if you opt for the IP route, you need to whitelist all the IP addresses in the range like following:


3. Setup origination (this is for inbound)
* Here you will specify Autocalls SIP server address as the origination SIP URI: `sip:5wed79aeavr.sip.livekit.cloud`

## **Step 2: Move numbers to Elastic SIP Trunking**
You’ve created the elastic SIP trunk, now you would need to purchase numbers / move existing numbers to this trunk.

## **Step 3: Import numbers to Robocallz**
Now the number is set up with your elastic SIP trunking, you need to import the number to Robocallz so that we will know how to route the call.
1. Go to your [Robocallz.ai](http://Robocallz.ai) dashboard
2. Navigate to **Your Phone Numbers**
3. Click “Integrate SIP trunk”

4. Fill in your details based on your integration type
```text theme={null}
Phone number: e.g., +1 555 0123
Username: Your extension username
Password: Your extension password
```

5. Here you will supply the termination SIP URI you set up in Step 1.
```text theme={null}
Server address: e.g., xxx.pstn.twillio.com
```

6. Here select Authorization type as you opted in step 2.
* If IP type is the option you have selected, add the IPs
```text theme={null}
54.244.51.0
54.244.51.1
54.244.51.2
54.244.51.3
54.172.60.0
54.172.60.1
54.172.60.2
54.172.60.3
```

7. Select the country of where your SIP trunk is located.

### **Step 4: Verify Setup**
After configuration:
1. Make a test call to your number/extension
2. Check that the AI assistant answers
3. Use the test call feature to verify outbound calling
## [****](https://docs.autocalls.ai/provisioning/sip-trunking/twilio#security-requirements)
**Security Requirements**
Your SIP credentials need to be secure:
* **Username**: Your extension number or provider-supplied username
* **Password must have**:
* 12 or more characters
* Numbers
* Upper and lowercase letters
* Special characters recommended
## [****](https://docs.autocalls.ai/provisioning/sip-trunking/twilio#common-issues)
**Common Issues**
**After connecting, inbound works but outbound does not work?**
* Check your Termination SIP URI If there’s a space in it, please remove. Also you should use a localized termination uri that’s near your region. Check out this [**doc**](https://www.twilio.com/docs/global-infrastructure/localized-uris/termination) to select one.
* Check your user name and credentials Please make sure you entered the right user name and credentials which shows in this dialog. Please note the user name is not the friendly name that shows in the credential list. The friendly is different to user name, you need to double check if you happen to give a different name.

Need help setting up? Our support team specializes in helping customers integrate their phone systems. We’ll guide you through the entire process, ensuring a smooth setup with your specific phone system configuration.
# **Zadarma Integration**
A step by step guide to connect to your Zadarma account via SIP trunking
## **Step 1: Gather Your Information**
* PBX Extension:
Go to My Switchboard, Extensions on the main page.

Find the following information:
```text theme={null}
Extension number: e.g., 1000
Server address: e.g., pbx.zadarma.com
Username: Your extension username
Password: Your extension password
```

* SIP Connection:
```text theme={null}
Phone number: e.g., +1 555 0123
SIP server: e.g., sip.zadarma.com
Username: Provided by your phone company
Password: Provided by your phone company
```
Go to Configuration, SIP Settings on the main page.

Find the following information:

* For **IP Authorization type**:
1. Go to Services, Connect number on the main page.

Go to Active numbers.

Click on the number you want to connect and press settings button.

1. Click on external services and then check the option for SIP URI.
Add `sip:extension@5wed79aeavr.sip.livekit.cloud `(this is Autocalls SIP server address) .

You will need these IPs which you will put in step 2 for inbound authorization type.
## **Step 3: Import numbers to Robocallz**
Now the number is set up with your elastic SIP trunking, you need to import the number to Robocallz so that we will know how to route the call.
1. Go to your [Robocallz.ai](http://Robocallz.ai) dashboard
2. Navigate to **Your Phone Numbers**
3. Click “Integrate SIP trunk”

1. Fill in your details based on your integration type
For PBX Extension:

For SIP Connection:

5. Here you will supply the termination SIP URI you set up in Step 1.
```text theme={null}
Server address: e.g., pbx.zadarma.com / sip.zadarma.com based on your integration type
```

6. Here select Authorization type.
* Add the **IPs** from **Zadarma** (Step 1).

Select the country of where your SIP trunk is located.
\\
## Step 3: Verify Setup
After configuration:
1. Make a test call to your number/extension
2. Check that the AI assistant answers
3. Use the test call feature to verify outbound calling
## Security Requirements
Your SIP credentials need to be secure:
* **Username**: Your extension number or provider-supplied username
* **Password must have**:
* 12 or more characters
* Numbers
* Upper and lowercase letters
* Special characters recommended
## Common Issues
## After connecting, inbound works but outbound does not work?
* Check your Termination SIP URI If there’s a space in it, please remove. Also you should use a localized termination uri that’s near your region. Check out this [**doc**](https://www.twilio.com/docs/global-infrastructure/localized-uris/termination) to select one.
* Check your user name and credentials Please make sure you entered the right user name and credentials which shows in this dialog. Please note the user name is not the friendly name that shows in the credential list. The friendly is different to user name, you need to double check if you happen to give a different name.

### **Step 3: Verify Setup**
After configuration:
1. Make a test call to your number/extension
2. Check that the AI assistant answers
3. Use the test call feature to verify outbound calling
## Security Requirements
Your SIP credentials need to be secure:
* **Username**: Your extension number or provider-supplied username
* **Password must have**:
* 12 or more characters
* Numbers
* Upper and lowercase letters
* Special characters recommended
## Common Issues
## After connecting, inbound works but outbound does not work?
* Check your Termination SIP URI If there’s a space in it, please remove. Also you should use a localized termination uri that’s near your region. Check out this [**doc**](https://www.twilio.com/docs/global-infrastructure/localized-uris/termination) to select one.
* Check your user name and credentials Please make sure you entered the right user name and credentials which shows in this dialog. Please note the user name is not the friendly name that shows in the credential list. The friendly is different to user name, you need to double check if you happen to give a different name.
**How do I set up dialing to international countries?**
* Search “geo” to find the “Voice Geographic Permissions” setting.
* Choose “Elastic Sip Trunking” in selector, and select the countries you would like to dial.
Need help setting up? Our support team specializes in helping customers integrate their phone systems. We’ll guide you through the entire process, ensuring a smooth setup with your specific phone system configuration.